1 Инструкция по настройке Samba в качестве контроллера домена, совместимого с Active Directory
1.17 Шаг 13: Настройка общего принтера
1.17 Шаг 13: Настройка общего принтера
You can share any printers already configured with CUPS, keep in mind that Samba communicates with CUPS via sockets, so you don’t need to set any configure any special permissions beyond a listen directive for the CUPS socket.
Принтеры, настроеные через CUPS можно сделать доступными для всей сети. Нет необходимости устанавливать никаких специальных разрешений, так как Samba общается с CUPS через соккеты. Eng.
1.17.1 Базовая настройка общего принтера
1 Create a print spool directory, and set the permissions properly. This is where Samba will store temporary files related to print documents:
1 Создайте папку для очереди печати принтера. Это папка, в которой Samba будет хранить временные файлы, относящиеся к печати документов: Eng.
 mkdir /usr/local/samba/var/spool
 chmod 1777 /usr/local/samba/var/spool
2 Configure samba to use it, by adding the following to /usr/local/samba/etc/smb.conf:
2 Настройте Samba для использования этой папки в файле /usr/local/samba/etc/smb.conf: Eng.
 [printers]
     comment = All Printers
     path = /usr/local/samba/var/spool
     browseable = Yes
     read only = No
     printable = Yes
[lock]
1.17.2 Сервер печати и драйверы принтеров
For the sake of convenience, Windows clients can query the server that is sharing a printer for a print driver. To enable this functionality in Samba, we have to create a special print$ file share.
Для удобства клиенты Windows могут использовать общий сервер печати и брать с него драйвера для принтеров. Для включения этой функциональности в Samba вам нужно создать специальную общую папку print$ Eng.
1 Create the print file share directory, and architecture sub-directories:
1 Создайте специальную общую папку и наполните ее поддиректориями: Eng.
mkdir -p/usr/local/samba/var/print/{COLOR,IA64,W32ALPHA,W32MIPS,W32PPC,W32X86,WIN40,x64}
1 Configure samba to use it, by adding the following to /usr/local/samba/etc/smb.conf:
1 Настройте Samba, добавив в файл /usr/local/samba/etc/smb.conf следующее: Eng.
 [print$]
     comment = Point and Print Printer Drivers
     path = /usr/local/samba/var/print
     read only = No
1 Log in as a Domain Administrator on a client computer
1 На клиентском компьютере залогиньтесь с учетной записью с правами администратора домена Eng.
2 Click Start -> Run ‘\\samba\’
2 Нажмите Start -> Run ‘\\samba\’ Eng.
3 In the list of shares, Double-Click ‘Printers and Faxes’
3 В списке общих папок двойным щелчком выберите ‘Printers and Faxes’ Eng.
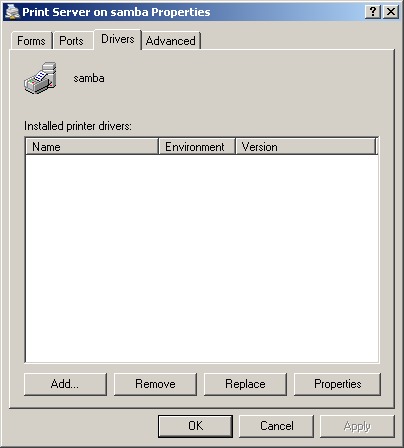
4 Click File -> Server Properties
4 Нажмите File -> Server Properties Eng.
5 On the Drivers Tab, Click ‘Add…’, then ‘Next’
5 На вкладке Drivers, нажмите на ‘Add…’, потом ‘Next’ Eng.

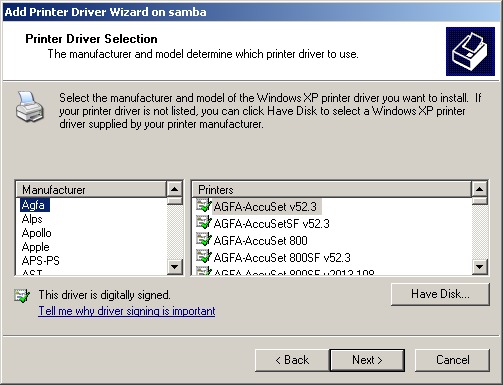
6 In the following prompts, choose the driver you would like to install, and click ‘Next’
6 На приглашение выберите драйвер для установки и нажмите ‘Next’ Eng.

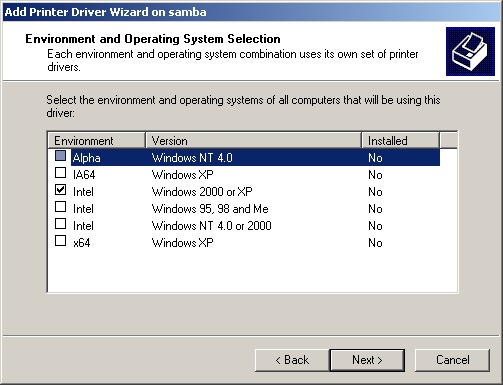
7 Choose the architectures you are installing the drivers for. Be aware if you choose an architecture that the client computer does not have the driver for you will be prompted to provide a disk with the drivers.
7 Выберите архитектуру для драйвера. Eng.

8 Close the Server Driver Dialog box
8 Закройте окно Server Driver Eng.
9 Right-click on the printer the driver is for and choose Properties
9 Щелкните правой кнопкой мыши на драйвере принтера и выберите свойства Eng.
10 On the Advanced tab, change the Driver drop-down box to the driver you just installed
10 На вкладке Advanced в выпадающем списке вы увидите установленый вами драйвер. Eng.
[/lock]
Ваш отзыв